Resurs Merchant API 2.0 for WooCommerce
Table of Contents
- Requirements
- Download/Install the Plugin
- Basic Configuration
- FAQ & General Questions
- API Settings
- Order Management
- Callbacks
- Advanced Settings
- Resurs Mail Flow Explained
- Purchasing with the New Merchant API
- Order Status Flow
- Troubleshooting and Error Handling
Requirements
- At least PHP 8.1
- At least WooCommerce 7.6.0
- SSL-connectivity (preferably OpenSSL)
- CURL (ext-curl with necessary libraries) 7.61.0 or higher
- Curl with CURLAUTH_BEARER-support
- Decimal precision: PHP’s default precision (php.ini default precision = 14) is usually sufficient. Increasing this value too high may cause unexpected rounding errors due to floating point representation issues. Recommended to keep precision at standard levels to ensure correct two-decimal rounding.
Download/Install the Plugin
Install the plugin via WordPress plugin repository (the plugin manager in wp-admin). It is NOT recommended to install the plugin manually since you will miss all automatic upgrades.
Url to the plugin itself is https://wordpress.org/plugins/resurs-bank-payments-for-woocommerce /
Installation
Installing from WordPress plugin repository
This page contains information about how to install the plugin properly.
The official release is located at https://www.wordpress.org/plugins/resurs-bank-payments-for-woocommerce/ and can be installed directly from the plugin installation system in WordPress.

Manually Installing the Plugin
Manually installing WordPress plugins can be risky because changing the plugin slug can prevent crucial updates from being applied. This opens up vulnerabilities that hackers can exploit, potentially giving them access to your site through outdated versions. You should avoid this if possible.
- Download the plugin from a trusted source.
- Extract the ZIP file locally.
- Upload the plugin folder to
wp-content/plugins/via FTP. - Activate the plugin via the WordPress dashboard.
- Verify the plugin slug to ensure updates work correctly.
Basic configuration
- Go to
WooCommerce→Settingsand click on theResurs Banktab - Enter your credentials in the
API Settingstab - Choose the correct Store ID for your store from the dropdown
- Save the settings
FAQ & General questions
Can I change the order number sequence?
Yes!
To update the order number sequence, modify the database auto-increment number like this
ALTER TABLE `[WP_DATABASE]`.`wp_posts`
    AUTO_INCREMENT = 200000000;
Change [WP_DATABASE] to your database name and set the AUTO_INCREMENT number to something that suits you.
Figuring out remote ip for whitelisting in firewalls
In test, we sometimes need to whitelist your server’s IP address, for example when your server is located in a country outside the Nordic region.
Normally, it is not very difficult to figure out which IP address needs to be whitelisted. Several online services can fetch your public IP address, or you can use this command from your server terminal. Example:
curl https://api.ipify.org/?format=txt
91.198.202.76

Detailed configuration information and store configuration
Stock Keeping Unit (SKU)
In order for the order management functionality built into the plugin to work as intended all products sold in your shop need to have a SKU configured.
The setting for this can be found in the Inventory tab in the Product data box on each product.

Decimals and rounding
In some platforms WooCommerce is configured to show prices with zero decimals. For certain technical reasons this can occasionally cause rounding errors, so we strongly recommend that you change this setting so to two decimals.
This setting can be changed by going to WooCommerce → Settings → General and scrolling to the Currency options section. It’s called Number of decimals and should be at the very bottom of the section.

See woocommerce-self-service for more information about all issues with decimals and roundings
Understanding Customer Link Expiration (TTL)
Customer links expire by default after 120 minutes. If a customer tries to complete a payment after this period, the transaction will be rejected. This expiration can be handled through WooCommerce’s stock management system, specifically using the Hold Stock (minutes) setting.
When stock management is enabled, WooCommerce reserves the product for the specified time in the Hold Stock setting, preventing others from purchasing the item while the order remains unpaid. Once the set time (e.g., 120 minutes) elapses, WooCommerce automatically cancels the unpaid order and releases the reserved stock back into inventory.
If stock management is not enabled, the system defaults to 120 minutes. This ensures that the reserved stock doesn’t remain indefinitely held for unpaid orders, providing a balanced and controlled inventory management system.
The default TTL can be configured between 1 and 43200 minutes (up to 30 days), depending on the store’s requirements.
This setting can be found under: WooCommerce > Settings > Products > Inventory > Hold Stock (minutes).

API Settings
This manual provides detailed instructions on how to manage credentials in the WooCommerce admin view for seamless functionality between environments and to ensure proper handling of user credentials.

Changing the payment method configuration
When making any changes to payment methods at Resurs Bank it is strongly recommended that you clear the cache in the Plugin configuration to avoid potential problems.
Accessing the Credentials Section
To manage credentials in WooCommerce:
- Navigate to the Resurs API section.
- Locate the Credentials section, where you will be able to input, update, and verify your credentials.
- The credentials fields include API Key, API Secret, and Store ID. These are essential for connecting the WooCommerce store to the external system.
INPUTTING CREDENTIALS
When entering your credentials:
-
Fill in the API Key, API Secret, and Store ID fields.
- Ensure that the credentials you enter are correct and valid, as incorrect credentials will prevent the store from functioning properly.
-
Fetching Store Data:
- After entering the credentials, click the Fetch Stores button to retrieve the store list associated with the entered credentials.
- The store list will appear if the credentials are valid. If the credentials are invalid, an error message will display, and no stores will be fetched.
HANDLING ERRORS WITH CREDENTIALS
If you enter incorrect credentials:
-
Fetching Store Failure:
- An error message will display, indicating that the credentials are incorrect.
- The store list will not appear.
-
Session Handling:
- Incorrect credentials may also impact session handling. If the session fails due to invalid credentials, the admin view will alert you, and no further actions can be taken until the correct credentials are entered.
-
Invalid Scope Warnings:
- If you switch between environments (Test and Production), there may be warnings about scope. These occur when WooCommerce tries to use previously saved data that conflicts with the current environment.
- Fetching the store list again with the correct credentials will resolve these issues, ensuring that the correct environment data is stored.
SWITCHING BETWEEN ENVIRONMENTS
When switching from Test to Production or vice versa:
- You must fetch the store data again using the Fetch Stores button.
- Ensure that the correct environment credentials are entered before fetching the store data.
- Once the store list is successfully retrieved, you can proceed to save the credentials for the new environment.
- The store list for the previous environment will no longer be available, and you must fetch new store data before proceeding.
REMEMBER!
- Always Verify Credentials: Ensure that the credentials you enter are accurate before attempting to fetch store data. This avoids unnecessary errors and ensures smooth functionality.
- Fetch Stores After Environment Switch: Whenever you switch between environments, remember to fetch the store data again to ensure that the credentials are properly updated for the selected environment.
- Check Error Messages: If you encounter any issues while saving or fetching stores, check for error messages related to invalid credentials or session handling. Address these issues before proceeding.
SUMMARY OF WORKFLOW
- Enter credentials in the appropriate fields.
- Fetch store data to verify the credentials.
- Once the store list is retrieved, save the credentials.
- If switching environments, fetch the store data for the new environment before saving.
- Ensure no “invalid scope” or “bad credentials” warnings appear after saving. If these occur, re-enter credentials and fetch the store data again.
By following these guidelines, the credentials management process in WooCommerce will be streamlined, ensuring smooth transitions between environments and avoiding common credential-related errors.
Payment Methods
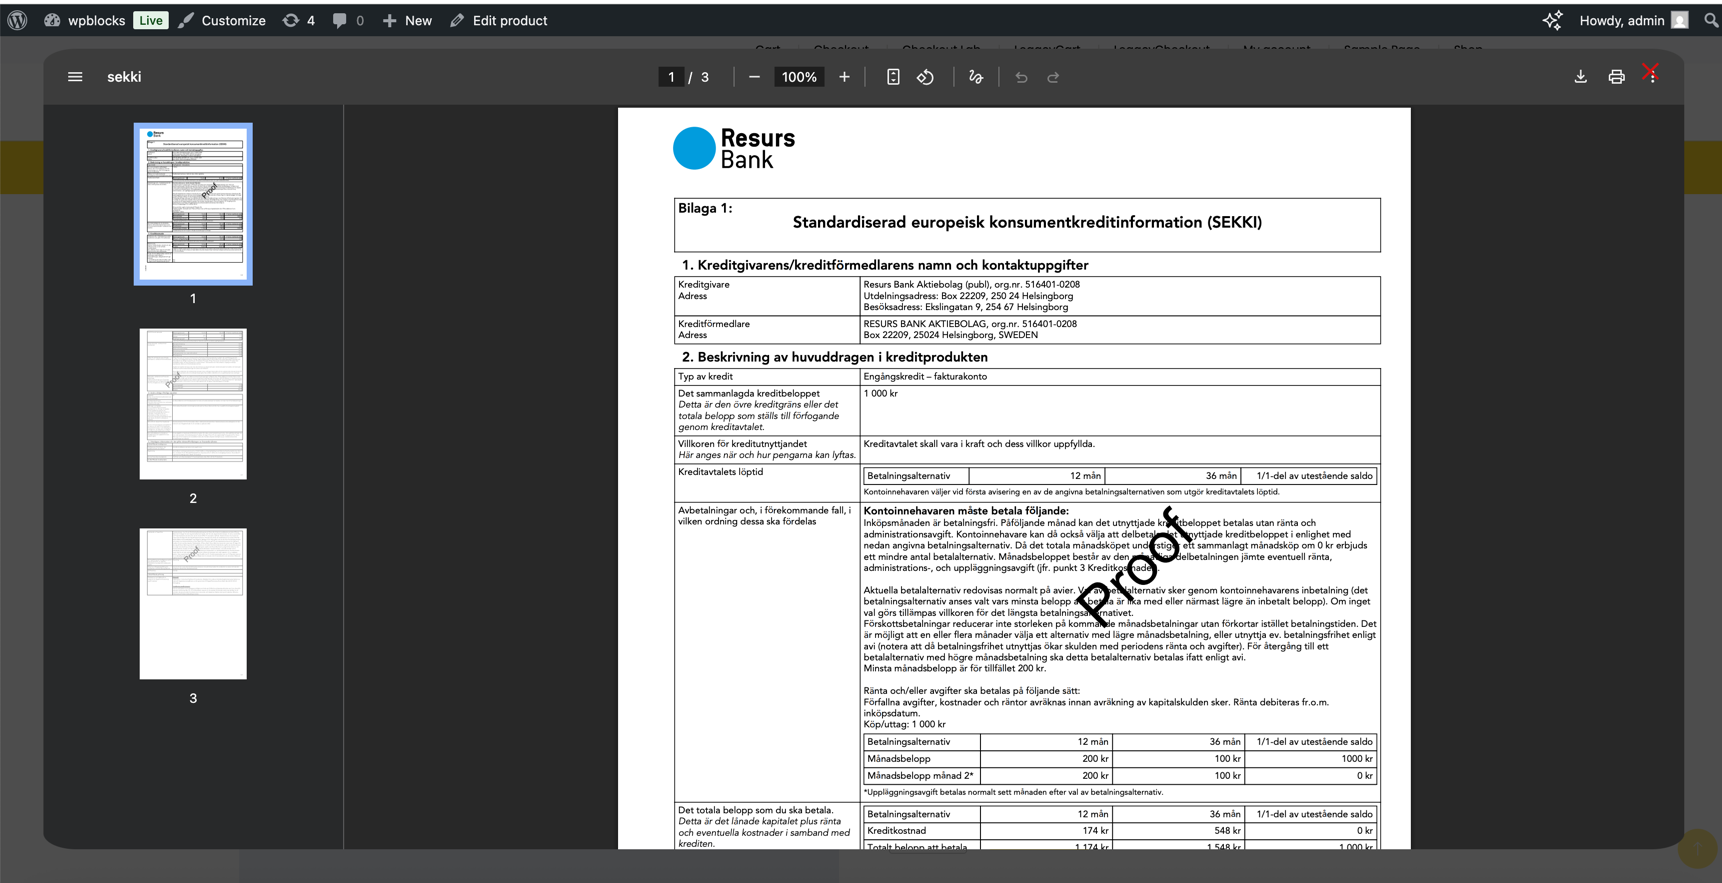
This tab has no settings on it but allows you to see which payment methods have been configured for your account. Example:

Part Payment
This feature of the plugin allows your store to display a small widget on individual product pages with information about available part payment options including a modal iframe popup with more detailed information.
See widget appearance below (they may differ a bit from each other respectively - the examples are taken from Sweden, where “Att låna pengar” is included).
Widget Appearance

Modal “Read More” Appearance
Configuration
The widget configuration options can be found on the Part payment tab under WooCommerce → Settings → Resurs Bank.
Before configuring the widget you need to set the global plugin configuration on the API Settings tab.

Part payment widget enabled
Toggle this setting to enable or disable the widget.
Payment method
This option allows you to choose which of your payment method to use for the widget.
Only payment methods that support part payment will be available here.
Annuity period
Controls how long of a payment period to calculate the monthly cost for.
Like with the payment method setting only supported periods will be shown.
Limit
Sets a lower monthly installment limit under which the widget will not be displayed.
If you set the limit higher than the payment method’s maximum configured purchase price, you will see a warning message after saving your settings.
You should set this value high enough that the monthly cost is at least SEK 150 (Sweden) or EUR 15 (Finland).
Order Management
Here you can enable/disable the different order management features of the plugin.

The plugin has functionality built into it for automatically updating the payment at Resurs Bank when the order is manually edit/updated in WooCommerce order view.
By default all of these features are enabled when the plugin is enabled but can be disabled in the settings under WooCommerce → Settings → Resurs Bank → Order Management.
Please read below about ERP’s.

Enable Capture
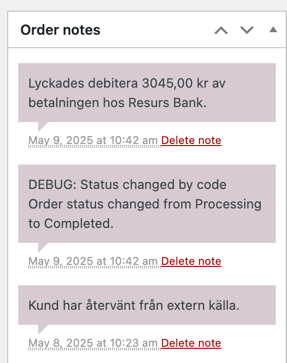
When this setting is enabled the payment will be automatically captured when the order status is set to Completed in WooCommerce.
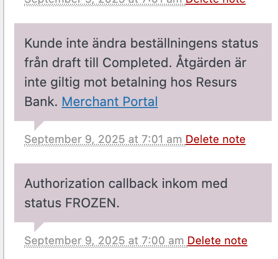
Once an order has been set to Completed it can no longer be reverted to another status.
The module does not support partial captures.
An order which has been partially captured using the Merchant Portal can still have the remaining order amount captured from WooCommerce.
Enable Cancel
This feature works much like the Enable Capture setting in that it automatically cancels the payment when an order is cancelled in WooCommerce. Similarly, once an order has been cancelled it can’t be reverted to another status but a payment that’s been partially cancelled through the Merchant Portal can still have its remaining order lines cancelled through the order view.
Enable Refund
Like the Enable Capture and Enable Cancel features this feature will both automatically handle refunds of the payment when a refund is applied to the order in WooCommerce and once an order has been refunded it can’t be reverted to another status and allow complete refunds of the payment when a partial refund has already been applied through the Merchant Portal.
Enable Modify
With this feature enabled changes you make to an order will be reflected on the payment.
However, there are some caveats. First of all, this only works if the payment can be captured, cancelled or if it has been fully cancelled. Furthermore, if the sum total for the changed order are equal to what they were before changing the order no call will be made to Resurs Bank. E.g. if you substitute one product for another with the exact same price then the change will not be transmitted to the payment.
One workaround for this issue is to cancel the payment through the Merchant Portal before editing the order in WooCommerce as this changes the authorized amount on the order to 0.
It should also be noted that it’s not possible to exceed the credit limit which has been authorized for the payment. Instead the customer should place a new order.
Should the modify action fail it can sometimes result in the payment being cancelled despite the order not being cancelled. If this happens you can click the Recalculate button to update the order state as this also pushes the order update to the payment at Resurs.
Please also note that changes made from Resurs Merchant Portal will not reflect back to the WooCommerce system and have to be made there as well.
Order Management with Resurs Bank Plugin
When handling WooCommerce orders paid through Resurs Bank, the order editor provides a simple but powerful way of synchronizing order status and payment handling directly with Resurs.
The order status dropdown is directly connected to Resurs Bank’s payment handling. The following actions are supported:
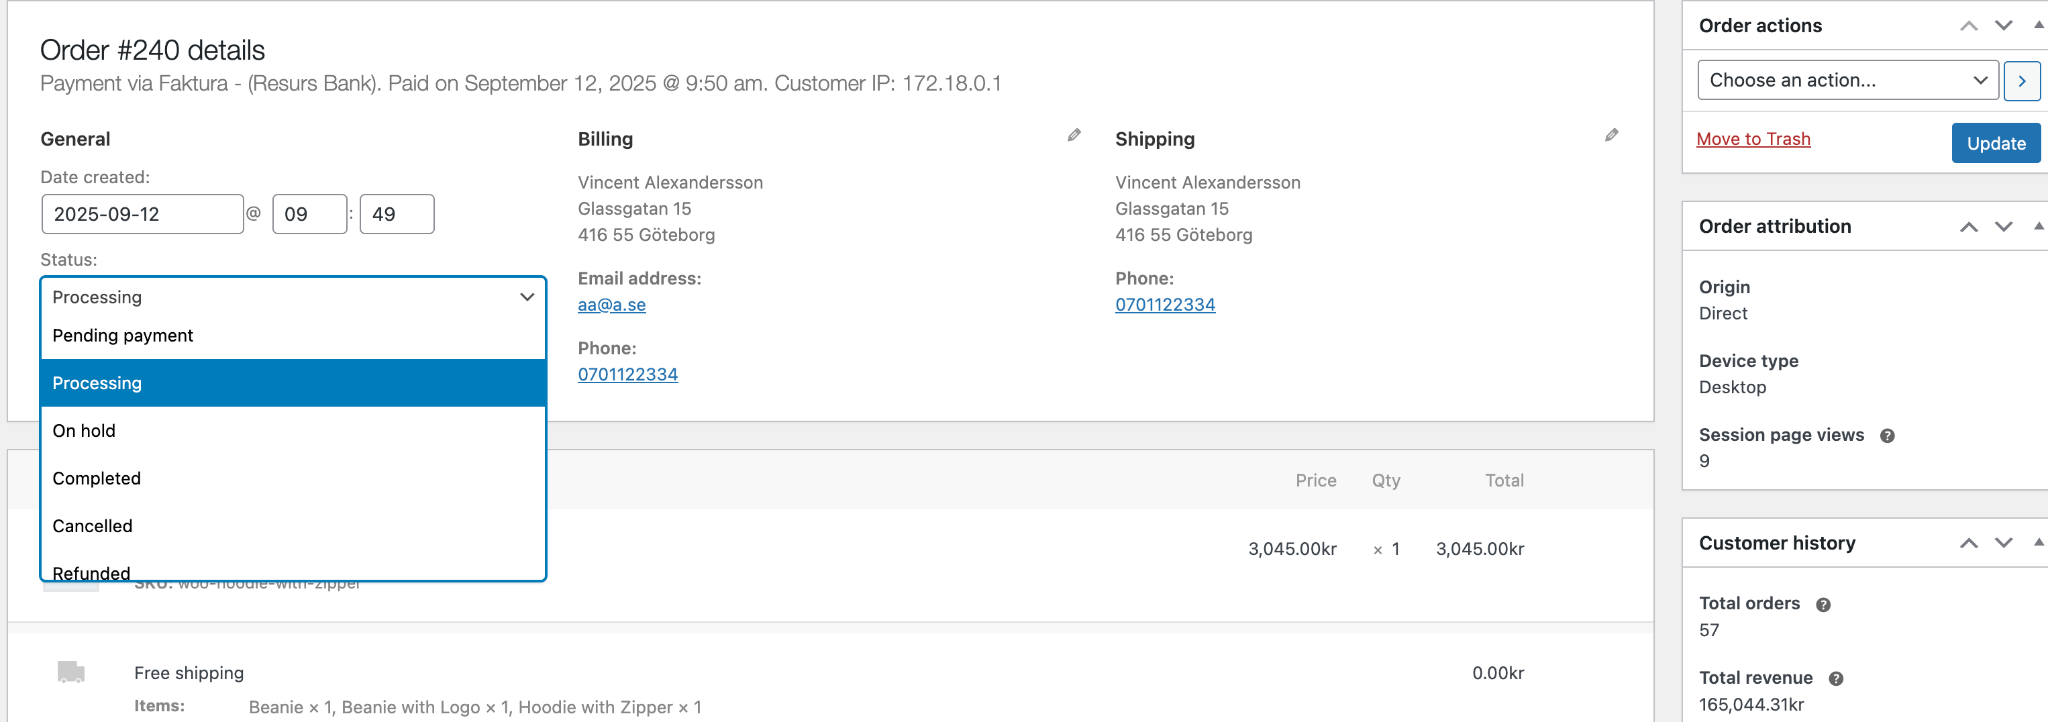
- Completed → Performs a full capture. This means the payment is finalized and captured at Resurs Bank. Once a capture has been made, the order can no longer be cancelled.
- Refunded → Performs a full credit. The order is refunded completely in Resurs Bank. Partial refunds via the dropdown are not supported.
- Cancelled → Performs a full cancellation. This is only possible if the order has not yet been captured. You cannot cancel an order that is already captured.
The workflow is straightforward: choose the correct status in the dropdown and click Update to trigger the action towards Resurs Bank. Each action performed is also logged in the order notes, ensuring that administrators have a clear audit trail of what has been done.
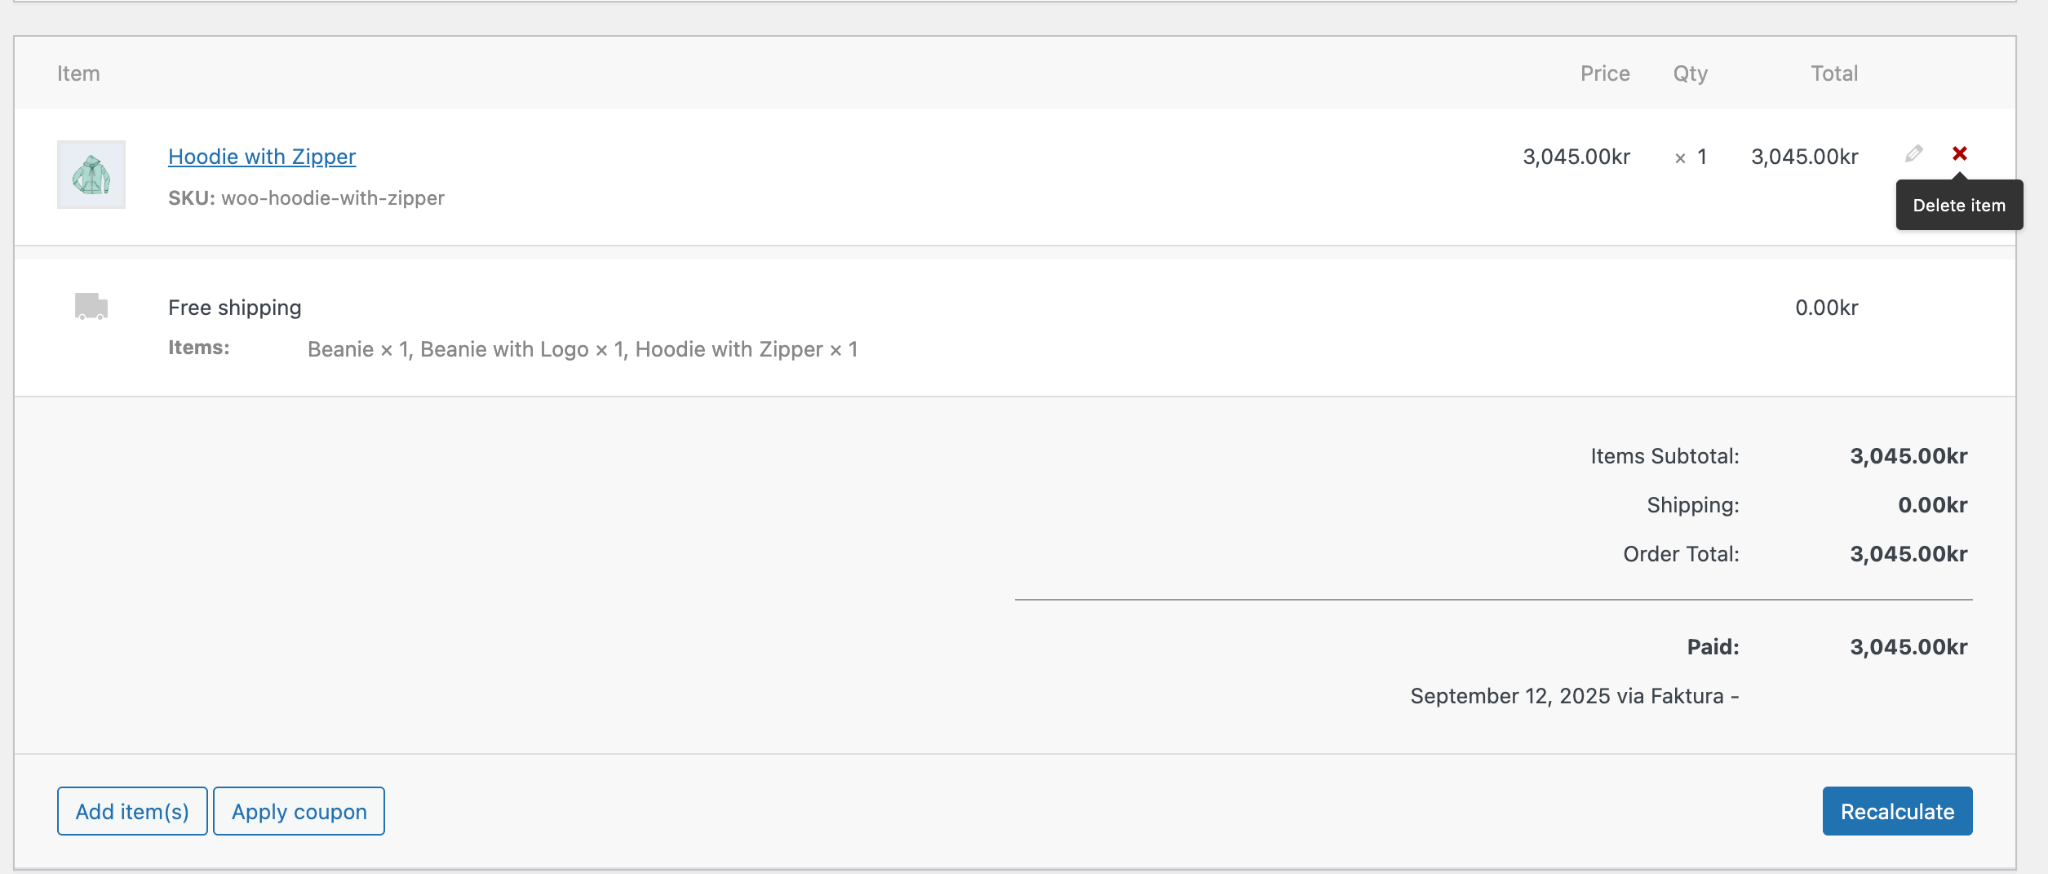
Order Line Handling
Resurs Bank also supports changes at the order line level:
- If you remove items from the order, the plugin updates Resurs Bank by first cancelling the entire order and then recreating it with the updated set of order lines (excluding the removed item).
- Adding new items is not supported. This limitation exists due to credit limits and authorization rules from Resurs Bank. Orders can only be reduced in value after authorization, not increased.
Administrative Considerations
We rely on administrators handling orders interactively through the WooCommerce admin panel. Managing these processes externally using custom plugins or hooks is not recommended, since there is a risk that the business logic will not execute correctly.
For example, if you manually trigger hooks such as update_status and the order is frozen, it is up to the integrator to ensure that frozen status checks are handled properly. The plugin has built-in mechanisms to prevent frozen orders from being mishandled (for example in suspected fraud cases), but there is always a risk of errors when bypassing the intended workflow.
External integrations and hook requirements
The automatic capture, modification and refund logic depends entirely on WooCommerce’s own action and filter hooks. The plugin subscribes to the following hooks and uses them to keep the Resurs Bank payment state in sync:
transition_post_status– invoked just before WooCommerce changes an order’s status (developer.wordpress.org)woocommerce_before_order_object_save– invoked when a High‑Performance Order Storage (HPOS) order is about to be persisted (developer.woocommerce.com)woocommerce_order_status_changed– invoked immediately after the status change has been committed (wp-kama.com)woocommerce_update_order– invoked when an order is saved after being edited in the admin interface (wp-kama.com)
If an external system such as an ERP, POS or warehouse management platform updates orders directly in the database, via direct REST calls or any other pathway that bypasses the hooks above, the plugin will not receive the events it needs and the order management features (capture, refund, cancellation, modification) will not be executed against Resurs Bank.
To ensure reliable synchronisation you must either:
- Extend the external integration so that it uses the official WooCommerce APIs, calling
$order->update_status()and$order->save()(or equivalent) so that WooCommerce dispatches its hooks, or - Disable “Automatic capture”, “Automatic refund” and “Allow order modifications” under the plugin’s Order Management settings and carry out these actions manually in Resurs Bank’s Merchant Portal.
Leaving the integration unchanged will lead to mismatches between WooCommerce and Resurs Bank that may prevent future captures or refunds and require manual intervention.
Conditions required for capturing payments
The plugin only allows capturing a Resurs Bank payment if certain conditions are met:
- The order must have an attached
Paymentobject with a validOrderstructure. - The payment must not be in a
REJECTED,FROZEN, orINSPECTIONstate. - The list of
possibleActionsprovided by Resurs Bank must contain eitherCAPTUREorPARTIAL_CAPTURE. - The payment must not yet be fully captured.
These rules are enforced through the Resurs Bank API. If the payment fails any of the checks above, capture functionality will not be available through the plugin and must instead be handled manually in the Resurs Bank Merchant Portal.
Additional HPOS handling
With WooCommerce’s High‑Performance Order Storage (HPOS), status transitions may bypass the legacy transition_post_status hook. To ensure full compatibility, the plugin also subscribes to:
woocommerce_before_order_object_save– This hook is used to validate state changes before they are persisted. For example, attempts to complete an order that is in a frozen state will be blocked and result in an error message (unable-to-capture-frozen-order).
The HPOS handler loads the persisted order, compares the old and new status, and enforces Resurs Bank’s business rules before allowing the status transition. This prevents illegal captures or cancellations from being attempted even in HPOS environments.
Callbacks
Callbacks are notifications sent to a specified URL when a payment reaches a certain status, such as authorization or rejection.
Also see Order Status Flow for more information about how statuses are updated during callbacks and payments.

- When a purchase is completed and the payment is ready to be handled at Resurs side a few callbacks are executed synchronously from Resurs. You can see the flow and more information about the callbacks here.
- To verify callback accuracy, the plugin makes a secure request to Resurs before processing the order in WooCommerce.
- When an order is synchronized with Resurs, the order status will update to either processing, on-hold or failed. If t he order is set to on-hold, this means that more actions could follow. For example, an order at Resurs can be temporarily frozen (which is the cause of on-hold) and will be pushed further (to processing) when ready to handle.
Advanced
This tab contains more advanced settings such as logging and cache settings. As a general rule it is recommended to keep the cache enabled as it significantly reduces the number of requests made to the API (and thus improves performance under most circumstances).

Resurs Mail Flow Explained
This section explains how the mail flow is integrated with the plugin. The plugin itself does not trigger or manipulate emails but relies on WooCommerce order status updates to control when emails are sent. These updates help prevent issues such as orders being canceled if left in “Pending Payment” for too long, depending on how WooCommerce is configured. For example, stock handling may automatically cancel orders in pending status after a set period. We also avoid using the “On Hold” status to pause orders while waiting for customer action, ensuring a smoother and more reliable order flow. Here’s an outline of what happens during a payment:
-
Customer initiates checkout and completes the payment:
The order is first created in WooCommerce.
-
Customer is redirected to an external page:
On this page, the customer completes tasks such as signing or confirming the payment. During this process, the order is already created in WooCommerce and is automatically set to “Pending Payment”, which is the default initial status for an order.
-
No further action occurs until the payment is completed:
Once the customer returns to the “Thank You” page, the WooCommerce order is updated to “Processing”. At this point, WooCommerce automatically sends the first confirmation email to the customer.
Alternative Scenario:
-
Customer is redirected to an external page:
On this page, the customer completes signing, payment via credit card (e.g., Visa/Mastercard), etc.
-
Customer exits the browser before returning to the success page:
If the customer closes their browser before being redirected back to the “Thank You” page, Resurs Bank initiates a callback to the shop.
-
Callback process and status update instead of customer success page:
A callback registers the payment completion in the system but is delayed briefly to avoid conflicts with the customer’s actions. This cooldown ensures that if the customer reaches the “Thank You” page during this time, the callback and customer actions do not interfere, allowing the order status to update correctly and the confirmation email to send without errors. This system is built to prevent duplicate email sending without the use of WC Worker Queue.
A Third Scenario Based on Merchant Errors:
-
Customer begins the process as described above:
The customer is redirected to an internal page but decides to abandon the process without explicitly canceling the payment. As a result, the payment remains in a “Pending” state in the system.
-
Merchant manually changes the order status incorrectly:
If the merchant mistakenly updates the order status to “Processing” in the WooCommerce order editor, WooCommerce will send a confirmation email to the customer. However, since the payment remains incomplete, the transaction is not finalized until the customer confirms and completes the payment.
Purchasing with the new Merchant API.
The Merchant API is, like the former simplified shopflow, made to go with a platform default rules but with some improvements. The WooCommerce order will (as before) first be created in Pending status, then the Resurs order will be placed, and finally-depending on the result-updated to Processing. The procedure looks like this:
- Purchase button is clicked. WooCommerce starts handling the order, setting the first Pending status.
- When WooCommerce checks (stock count, etc) are finished, Resurs plugin takes over to create the payment. During this process, signing the payment also occurs.
- When Resurs is done, the order can be either accepted (processing), rejected (failed) or paused (on-hold). Depending on the outcome, Resurs will redirect customers back, either to the final order received-page (“thank you”) or a failure-page (if Resurs rejects the order, customers redirected to a fail-page will render the order to be canceled). Take a look at the order status flow for more information about . how this is set up.
- Side by side with the above steps, callbacks are also sent from Resurs, in case that the customer fails to return to the thank you page. This makes sure that the statuses are properly set.
Order Status Flow
The order status flow is a crucial part of the plugin. Statuses are primarily updated during callbacks and customer payments. The order status flow is as follows:
- The customer initiates checkout and completes the payment.
- Callbacks are initiated after the customer’s interactions are either complete or abandoned. Abandonment can occur, for example, when payments are initiated but authorization/signing with third parties are incomplete or cancelled.
Callbacks may be triggered at the same time the customer completes the payment. This could potentially cause conflicts, like race conditions where the order status changes incorrectly. This is easily prevented by ensuring that the plugin’s callbacks are not allowed to respond to requests from Resurs Bank until after a certain period of time has passed. Meanwhile, the customer is given the opportunity to reach the thank-you page in time. The period is set to 60 seconds from the moment the order was created or updated. Thereafter, status updates for Resurs are executed as follows:
Status::update(order: $order);
Status::update Process
The status control process ensures that order statuses are correctly updated based on payment statuses returned from Resurs Bank. The implementation follows these steps:
-
Validation Check:
- Before any processing, the plugin checks if the payment is a valid Resurs Payment (
isValidResursPayment).
- Before any processing, the plugin checks if the payment is a valid Resurs Payment (
-
Fetching Payment Details:
- The payment details are fetched from the repository (
getPayment).
- The payment details are fetched from the repository (
-
Order Status Validation & Validation Control:
- The plugin verifies if the current payment status matches the expected order status (
BeforeOrderStatusChange::validatePaymentAction), provided that the existing order status is notpending. If the criteria are not met, the plugin will not proceed with any further actions. validatePaymentActionis demonstrated in the following steps.- The plugin checks if the payment status at Resurs Bank is
ACCEPTEDorREJECTEDand if the order status ispending. If these criteria are not met, the plugin will not proceed with any further actions. - During the validation process, the plugin determines through
orderStatusFromPaymentStatuswhich status the order should receive if everything is correct.- For
ACCEPTEDstatus, the order is marked asprocessing. - For
REJECTED, a check determines whether the status should befailedorcancelledbased on task status details. - Otherwise, the status is set to
on-hold(Other statusen can beTASK_REDIRECTION_REQUIRED,INSPECTION,SUPPLEMENTING_REQUIRED,FROZEN).
- For
- The plugin verifies if the current payment status matches the expected order status (
-
Order Status Update (from
match ($payment->status) {):- The plugin updates the order status based on the payment status from Resurs Bank.
- If the payment status is
ACCEPTED, the order status is set toprocessing. - If the payment status is
REJECTED, the order status is set tofailedorcancelledbased on task status details (this will be triggered from theupdateRejectedmethod). - If any other status than expected is found in
$payment->status, the order status is set toon-hold.
- If the payment status is
- The plugin updates the order status based on the payment status from Resurs Bank.
-
The
updateRejectedMethod:- This method determines the appropriate status for all
REJECTEDorders, which will be set to eitherfailedorcancelleddepending on task status details retrieved from:Repository::getTaskStatusDetails(paymentId: $payment->id) - The task status details from Resurs are examined for the
completedflag (refer to Resurs API Documentation). - If the
completedflag is set to true, the order status will be set tofailed. - If the
completedflag is set to false, the order status will be set tocancelled. - We acknowledge that the above method is not ideal and will be improved in future updates. Currently, we can take advantage of the
rejectedReasonin MAPI’s getPayment request to assist in providing better feedback or error logging. At a very basic level, however, all orders marked asREJECTEDby Resurs Bank should be treated as purecancelled.
- This method determines the appropriate status for all
-
Error Handling:
- If an error occurs during the status determination process, it is logged, and a default status is returned.
Troubleshooting and error handling
Tracing errors and logging
From time to time, you’ll need to handle problems with the plugin. Before you contact us with error reporting, make sure the below settings tab are correctly filled in. To avoid us to break your platform, the field for log path is by default empty. If your system can’t write logs to the log path defined there, it may not work at all (which is why logging is disabled by default). Best practice here is to use you path-to-wordpress/wp-content/uploads/wc-logs which is where WooCommerce is normally writing their ownlogs. You can look at the example screen dump below.
By using the same path as your wc-logs directory, you will be able to look at the log files the same way that you browse WooCommerce logs.

When logging is enabled with the above “practices”, you will be able to see the logs inside the wordpress platform under WooCommerce logs section like this:

Handling free shipping cost values requiring numeric casting
WooCommerce usually returns the shipping cost as a decimal string, but there are edge cases where WC_Order_Item_Shipping::get_total() yields an empty string (or an invalid numeric), most commonly when the Free Shipping method has been applied (by default, free shipping don’t behave like this and this far it hasn’t been reproduceable) or when a legacy order was created before cost fields were normalised. Attempting to convert that empty string directly to float via Order::convertFloat() triggers an IllegalValueException. Developers should therefore normalise the value before it reaches the converter:
$rawCost = $item->get_total();
$cost    = is_numeric($rawCost) ? (float) $rawCost : 0.0;
By explicitly casting non‑numeric or empty values to 0.0, the implementation remains forward compatible and avoids PHP‑8 type errors. For context, see WooCommerce core issue Legacy order data PHP 8 compatibility #39489 which documents the empty string behaviour. GitHub issue #39489 (github.com)
Tip – If you maintain third‑party shipping extensions, ensure that they always return a numeric cost so the plugin can rely on strict typing.